Basics of hardware hacking
This course shows the basics of hardware hacking using password auhenticaton code as an example.
Created by @maldr0id
How does a serial protocol work?
As you already know the serial protocol uses two channels to communicate - RX and TX. The data on both of these channels is encoded in the same way. As you’ve also noticed when the channel is idle (i.e. no data is being transmitted) the channel is set to high.
Serial protocol has several parameters which picocom presented to us when we run the serial console:
$ picocom /dev/ttyACM0 -b 115200
picocom v3.1

port is        : /dev/ttyACM0
flowcontrol    : none
baudrate is    : 115200
parity is      : none
databits are   : 8
stopbits are   : 1
The serial “frame” (one unit of communication) looks like this:
| Start bit | Data bits | Parity bit | Stop bit |
|---|---|---|---|
| Always one bit | A number of data bits | One bit for error correction | A number of stop bits |
| Always low | high if “1”, low if “0” | Depends on the algorithm | Always high |
The parameters that control the number of bits are called D (for “data bits”), P (for “parity bit”) and S (for “stop bits”). The default values for these are:
- D = 8 (bits)
- P = N (none - there is no parity bit)
- S = 1 (there’s one stop bit)
These are the most popular values, but different serial protocol implementations may use different values. ATMega CPU is using the default values, which means that each frame will start with one start bit (low), then we will have 8 bits of data (low/high) and one stop bit (high).
The usual way to write the parameters is by separating them with slashes (e.g. 8/N/1 for the default values) or just writing them in the DPS order (e.g. 8N1). The middle parameter (parity) is specified by a character relating to the error detection algorithm name, which means that there’s no ambiguity.
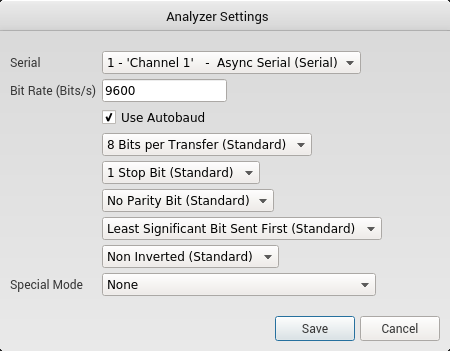
Let’s take a look at our Logic software capture and try to decipher the first byte (= 8 bits = 1 frame). Fortunately the Logic software contains a serial protocol analyser. In order to enable it click on the + sign next to the Analysers box on the right hand side and choose Async serial. Choose Channel 1 and check the “Use Autobaud” checkbox (don’t worry, I’ll explain it later). Leave all the others parameters as is, because we’re assuming that Arduino uses the 8N1 serial protocol parameters. The dialog should look like the one below.
Now the Channel 1 row should have blue boxes above the data transmission and some white dots in between the lows and highs, like in the screenshot below.

The blue box contains the ASCII character that Logic thinks is being sent and the dots signify the data bits. The annotated screenshot below shows how one serial protocol frame can be decoded.
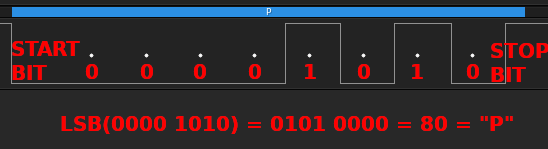
As you can see, and you’ve probably noticed when we set up the analyser, the least significant bit is sent first. It means that we have to read the number starting from the bit that is sent last. You can also see the start bit and the stop bit.
The last thing left is: how do we know how long a “bit” is? You can see in our example that the transmission starts with the start bit (low) and four zeros. This means that the line stays low for a very long time, but we don’t know how many bits that is. This is where the “autobaud” algorithm comes useful.
If we don’t know the exact length of one bit (which is measured in a number of bits per second) we can guess it. The way this guessing algorithm works is very simple. First you assume that the first “low” time is one bit. Then you go to the next “low” period and, if it’s shorter, you assume this is the length of one bit. So on, until you reach the end of the transmission.
You can see the length of any “valley” if you just hover your mouse cursor over it. Let’s hover it over one of the bits.
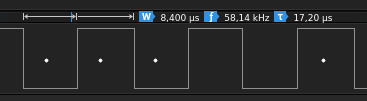
It shows that the length of that bit is 8.400 microseconds, which means that the speed of the transmission is:
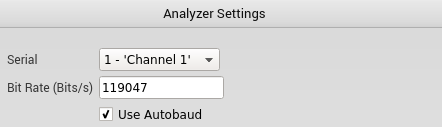
If you now click on the gear next to the Async serial analyser and choose Edit settings you will see that Logic also guessed the same bit rate.
Now that we now everything there is to know about the serial protocol (ok, not EVERYTHING, but more than we did) it’s time to actually look at the password check time measurement (remember that part?)